How to Create a System Repair Disk / Recovery Drive in Windows 8 or Windows 10?
Reader Question:
“Hi Wally, I was playing a game on my PC when this error appeared. I tried looking for a solution online but I can’t find any fix for this. Any ideas?” – Nancy S., Australia
Before addressing any computer issue, I always recommend scanning and repairing any underlying problems affecting your PC health and performance:
- Step 1 : Download PC Repair & Optimizer Tool (WinThruster for Win 10, 8, 7, Vista, XP and 2000 – Microsoft Gold Certified).
- Step 2 : Click “Start Scan” to find Windows registry issues that could be causing PC problems.
- Step 3 : Click “Repair All” to fix all issues.
Setting up weekly (or daily) automatic scans will help prevent system problems and keep your PC running fast and trouble-free.
Wally’s Answer: The system recovery disk has been around for a while (since Windows 7). It can be a very useful tool to fix Windows. However, since Windows 8, we have the Recovery Drive (USB). When the time is right, it can really help you get out of a serious jam.
Here, we will discuss how you can make and use a system repair disk in simple and easy to follow steps. Lets Go!
Problem
The user wants to fix their Windows installation using a bootable Recovery Drive USB disk.
Solution
Here is an explanation of what a Recovery Drive USB disk does and what you can use it for.
What Is A Recovery Drive USB?
Recovery Drive is a new feature in Windows 8 and Windows 10. It allows you to make a bootable USB recovery drive which does the same things that a system repair disc does. But, it also helps install Windows. This is done by copying system files from your current PC for the Windows reinstallation process.
How To Make A Recovery Drive (USB) in Windows 10?
Make sure to copy important data off the USB before continuing.
Remember, the USB recovery drive is tied to the PC that is used to create it.
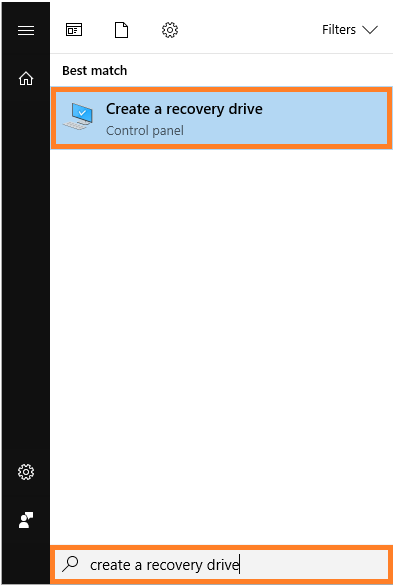
Press the Windows Key to bring up the Start Menu and start typing to search.
Type recovery drive and click Create a recovery drive from the list of search results to open it

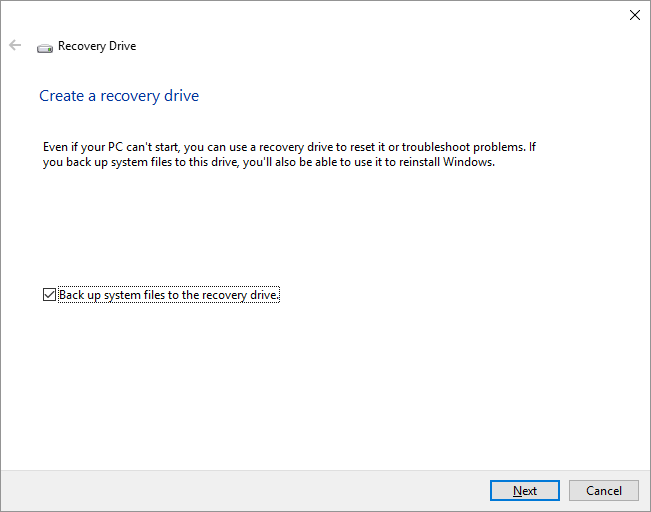
It should look something like this

You can see that the option to Backup system files to the recovery drive is checked by default. If you leave this option checked, then it will take longer to make the backup, but then this USB will be capable of reinstalling Windows for you if needed.
Click Next to continue

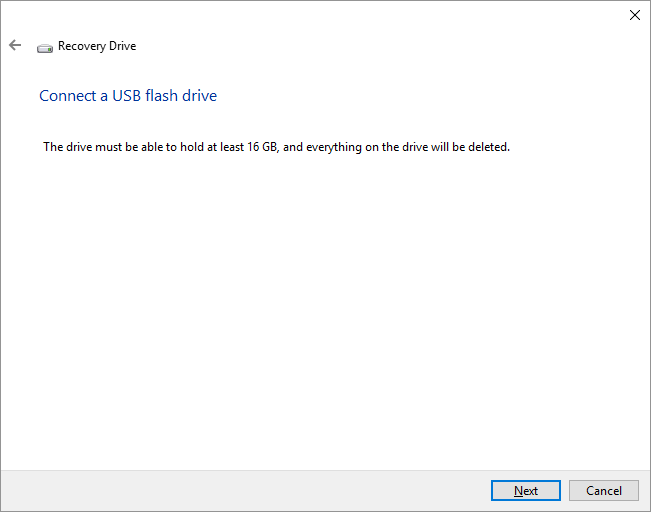
It will tell you the size of the USB flash drive needed for the backup with a warning that the previous data will be deleted.
Here, we needed a 16GB flash drive. Yours might be different.
Insert the USB flash drive and click Next to continue.
Click the Create button when you’re ready.
When the process is complete, quick Finish to close the window.
I Hope You Liked This Blog Article! If You Need Additional Support on This Issue Then Please Don’t Hesitate To Contact Me On Facebook.
Is Your PC Healthy?
I always recommend to my readers to regularly use a trusted registry cleaner and optimizer such as WinThruster or CCleaner. Many problems that you encounter can be attributed to a corrupt and bloated registry.
Happy Computing! ![]()

Wally's Answer Rating
Summary: Every Windows Wally blog post is evaluated on these three criteria. The average of all three elements determines an "Overall Rating" for each blog post.


