How To Fix Power Manager Gauge Error When Starting Windows 10
Reader Question: “Hi Wally, Windows 10 shows error while loading resource DLL file. Power manager gauge appears on the starting of windows. please provide a solution. Thank You.” – George K., New Zealand
- Step 1 : Download PC Repair & Optimizer Tool (WinThruster for Win 10, 8, 7, Vista, XP and 2000 – Microsoft Gold Certified).
- Step 2 : Click “Start Scan” to find Windows registry issues that could be causing PC problems.
- Step 3 : Click “Repair All” to fix all issues.
Setting up weekly (or daily) automatic scans will help prevent system problems and keep your PC running fast and trouble-free.
Wally’s Answer: DLL errors in Windows 10 can be a bit confusing to most people. In many instances, these errors are related to system files and cannot be fixed simply by replacing the file. Replacing DLL files works only if the DLL file is the same version, which depends on the build of Windows and can get complicated. But, don’t worry. We can fix most DLL errors using the DISM and SFC commands in Windows 8 and Windows 10.
Problem
Windows 10 is showing an error while loading a resource DLL file. The error displays the following text and does not allow Windows to load: Resource DLL Power Manager Gauge
Cause
This error is disproportionately frequent in case of Lenovo laptops. It is possible that the Power Manager utility installed by Lenovo is the case of these issues. However, this issue can also be caused by other reasons.
Solution
Here are some ways to fix the Power Manager Gauge DLL error:
Power Manager Gauge Issue in Lenovo Laptops
If you’re using a Lenovo ThinkPad then the ”Power Manager Gauge Error” might have been caused by the Power Manager tool installed on Lenovo laptops. It is a power management software which you can remove if you don’t need it.
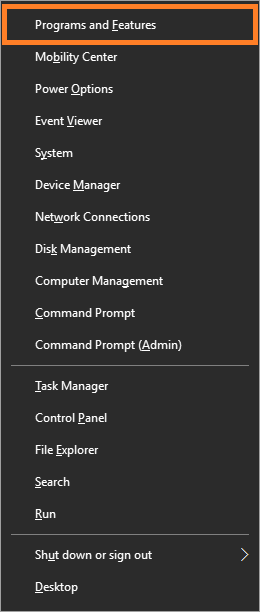
Please start Windows 10 in Safe Mode and uninstall the Power Manager tool from “Programs and Features”. Press the Windows Key + X and click Programs and Features.

Find Power Manager from the list of programs and uninstall it. Restart the computer and see if this fixes the problem.
Try Using The DISM Command Line Tool
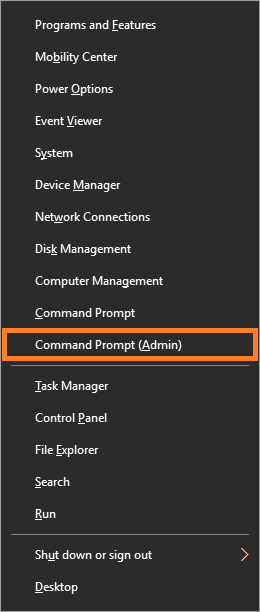
The DISM Command Line Tool fixes the backup copy of system files inside Windows 10 “Windows Recovery Image”. Press Windows Key + X to see a menu appear and choose Command Prompt (Admin) from the list.

Now, type the following command DISM /Online /Cleanup-Image /RestoreHealth and press Enter to run it Wait until the scan is finished.
This can take 30 minutes or more. DISM will try to use Windows update to replace damaged files. Please read a more comprehensive guide on how to use the DISM tool here if you want to use additional commands.
Try Using The SFC /Scannow Command
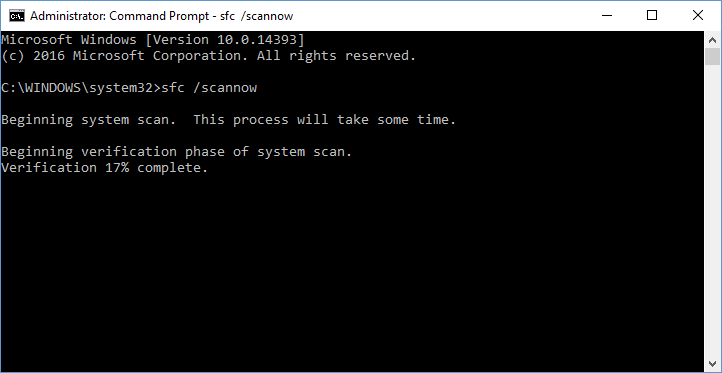
The SFC command scans all Windows system files and replaces damaged files after comparing them to the “Windows Recovery image”.
- Press Windows Key+X > click Command Prompt (Admin)

- Type the command sfc /scannow > press Enter

Go ahead and use this command right now and see if it fixes the problem. I Hope You Liked This Blog Article! If You Need Additional Support on This Issue Then Please Don’t Hesitate To Contact Me On Facebook.
Is Your PC Healthy?
I always recommend to my readers to regularly use a trusted registry cleaner and optimizer such as WinThruster or CCleaner. Many problems that you encounter can be attributed to a corrupt and bloated registry. Happy Computing! ![]()

Wally's Answer Rating
Summary: Every Windows Wally blog post is evaluated on these three criteria. The average of all three elements determines an "Overall Rating" for each blog post.


