How To Fix The BITLOCKER FATAL ERROR Error
Reader Question:
“Hi Wally, Can you please help me fix bitlocker fatal error. I’ve been trying diffenet fixes from other places and I can’t fix it. Thanks in advance.“ - Erin P., Canada
Before addressing any computer issue, I always recommend scanning and repairing any underlying problems affecting your PC health and performance:
- Step 1 : Download PC Repair & Optimizer Tool (WinThruster for Win 10, 8, 7, Vista, XP and 2000 – Microsoft Gold Certified).
- Step 2 : Click “Start Scan” to find Windows registry issues that could be causing PC problems.
- Step 3 : Click “Repair All” to fix all issues.
Setting up weekly (or daily) automatic scans will help prevent system problems and keep your PC running fast and trouble-free.
Wally’s Answer: The Bitlocker Fatal Error may appear before turning the computer on. This and other blue screen errors can seem confusing but once you are able to identify the error, they are relatively easy to solve.
Problem
The Bitlocker Fatal Error or STOP 0×00000120 appears when the computer is turned on. The error appears on a blue screen and the computer crashes.
Cause
The Bitlocker Fatal Error can be caused by failing to recover from the Bitlocker Drive Encryption. This software can encrypt data on the computer’s whole hard drive for security purposes. Some causes of this error are:
- Corrupt file system.
- Changes in the boot order of hard disks in the BIOS.
- Addition or removal of hardware such as hard drives.
Solution
Here are some ways to solve the Bitlocker Fatal Error:
Remove Other Devices From The Computer
When you connect another hard drive to the computer, the computer might start to boot from that disk. This can happen with USBs, CDs, DVDs, and other secondary storage devices. Make sure to remove these extra devices from the computer before continuing.
Run A Disk Scan On The Hard Drive
Errors in the file system can be repaired by using a hard disk scan built-into Windows. Follow these instructions:
- Go to the Computer icon or My PC in Windows 8
- Right-click the system partition icon

It is usually the C Drive. - Click Properties.
- Go to the Tools tab > click Error Checking
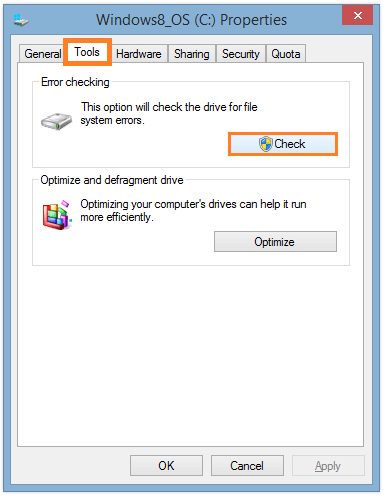
- Follow the instructions to perform the scan. If you see a check-box to Automatically fix system errors then check it.
Check The BIOS For A Change In The Boot Order
You will need to change this through the BIOS settings. This can be different for different computers. Click here to learn how to enter BIOS settings on your computer.
Once in the BIOS settings, look for a tab titled Boot or Boot Settings. You should be able to find the boot order there. Make sure that your computer’s hard drive that has the Windows operating system installed on it is at the highest position in the boot order. You only need to worry about this if you are using more than one hard drive on the computer.
In older computers, you might also need to disable other devices in order to boot from the hard drive.
I Hope You Liked This Blog Article! If You Need Additional Support on This Issue Then Please Don’t Hesitate To Contact Me On Facebook.
Is Your PC Healthy?
I always recommend to my readers to regularly use a trusted registry cleaner and optimizer such as WinThruster or CCleaner. Many problems that you encounter can be attributed to a corrupt and bloated registry.
Happy Computing! ![]()

Wally's Answer Rating
Summary: Every Windows Wally blog post is evaluated on these three criteria. The average of all three elements determines an "Overall Rating" for each blog post.

