How To Fix The DPC_WATCHDOG_TIMEOUT Error
Reader Question:
“Hi Wally, I recently did some updates and now my computer keeps getting a dpc_watchdog_timeout BSoD error. This sometimes happens when I’m playing a video game. Other times it just happens randomly.” – Mario H., United Kingdom
Before addressing any computer issue, I always recommend scanning and repairing any underlying problems affecting your PC health and performance:
- Step 1 : Download PC Repair & Optimizer Tool (WinThruster for Win 10, 8, 7, Vista, XP and 2000 – Microsoft Gold Certified).
- Step 2 : Click “Start Scan” to find Windows registry issues that could be causing PC problems.
- Step 3 : Click “Repair All” to fix all issues.
Setting up weekly (or daily) automatic scans will help prevent system problems and keep your PC running fast and trouble-free.
Wally’s Answer: This error appears due to incompatible device drivers or software. Some video games like Battlefield 4 have been known to show this. Here we will look at some ways to fix the dpc_watchdog_timeout error.
Problem
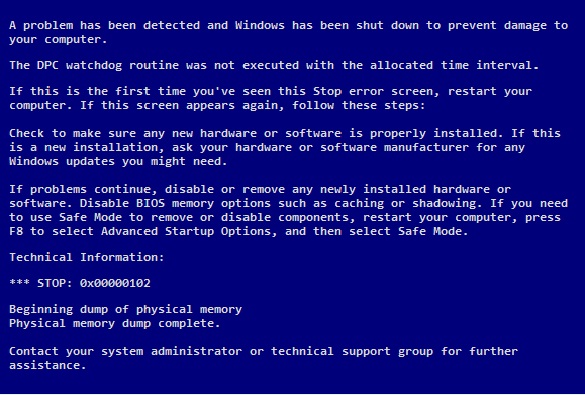
The DPC_WATCHDOG_TIMEOUT error also known as the Stop 0×0000102 error appears when trying to run a certain software program or when loading a corrupt device driver. The blue screen appears, and then the computer restarts to prevent damage to Windows and the computer’s hardware components.

Cause
The dpc_watchdog_timeout error usually occurs when the computer’s processor is not cooperating with its threads and cores due to a lack of response. This can be due to software or device driver problems.
Solution
Here are some ways to fix the Dpc_watchdog_timeout error.
Use System Restore To Fix The Dpc_watchdog_timeout Error
If the problem appeared recently then using system restore can help solve it quickly. Click here to learn more about how to use system restore.
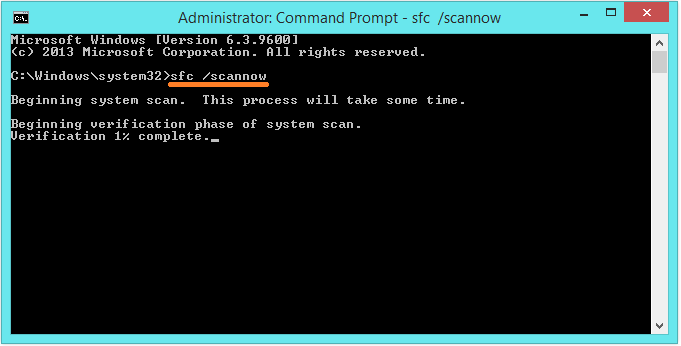
Use sfc/scannow To Fix Important System Files
- Use Windows Key+X and Click Command Prompt (Admin) to open it.
- When it opens, type sfc /scannow and press Enter

Update Chipset, ACHI, and SATA Drivers
Updating these drivers can help solve this problem easily. You will need to go to your motherboard manufacturer’s website or the website of your computer vendor. Look for the drivers, download, and install the drivers by following their instructions.
You can also update these drivers automatically by using DriverDoc. It will find new driver updates and notify you automatically for all devices on your computer.
Change ACHI, and SATA Settings In The BIOS Settings
You can access the BIOS settings by restarting the computer and pressing the F2 key. This should get you into the bios settings of most computers, if not then click here for more instructions. Once you get into the BIOS settings, set them to cater to both ACHI and SATA.
Here Are A Few More Things You Can Try
- Make sure that the computer is not over-heating. You can use SpeedFan to monitor your computer’s temperature.
- Access the computer’s BIOS settings as explained above and reset CMOS settings to default. If you can’t find that option then reset all settings to default.
- If you have any software installed on your computer like “Asus’ AI Suite” then uninstall it. These software programs are known to cause problems.
- If you have Windows 8 then you can try Refreshing or Resetting Windows 8. You can also reinstall Windows using an installation disk.
- If none of this works then you may need to replace the computer’s processor.
I Hope You Liked This Blog Article! If You Need Additional Support on This Issue Then Please Don’t Hesitate To Contact Me On Facebook.
Is Your PC Healthy?
I always recommend to my readers to regularly use a trusted registry cleaner and optimizer such as WinThruster or CCleaner. Many problems that you encounter can be attributed to a corrupt and bloated registry.
Happy Computing! ![]()

Wally's Answer Rating
Summary: Every Windows Wally blog post is evaluated on these three criteria. The average of all three elements determines an "Overall Rating" for each blog post.


