How To use a Windows 8 Recovery Disk
Reader Question:
“Hi Wally, When I bought Windows 8 it said that there are new recovery features built into Windows 8. How do I use them?” – Lisa W., USA
Before addressing any computer issue, I always recommend scanning and repairing any underlying problems affecting your PC health and performance:
- Step 1 : Download PC Repair & Optimizer Tool (WinThruster for Win 10, 8, 7, Vista, XP and 2000 – Microsoft Gold Certified).
- Step 2 : Click “Start Scan” to find Windows registry issues that could be causing PC problems.
- Step 3 : Click “Repair All” to fix all issues.
Setting up weekly (or daily) automatic scans will help prevent system problems and keep your PC running fast and trouble-free.
Wally’s Answer: In the olden days of Windows lore, if your Windows installation went rogue on you, you sometimes had to format your Windows partition and usually reinstall Windows after that. Not anymore.
The Windows 8 Recovery Disk feature
Windows 8 is not only stable like Windows 7 but it also has its own recovery feature built-in to help you get your computer back to normal if something goes horribly wrong. All you need to do is make a recovery disk in advance. Here’s how to do it:
Create your Windows 8 Recovery Disk image
You can use a DVD as a recovery disk but using a memory card or a USB flash drive might be a better option. Here’s how you make a Windows 8 recovery disk image:
- Right-click the Windows icon on the lower-left corner of the Windows 8 desktop and select Command Prompt (Admin).
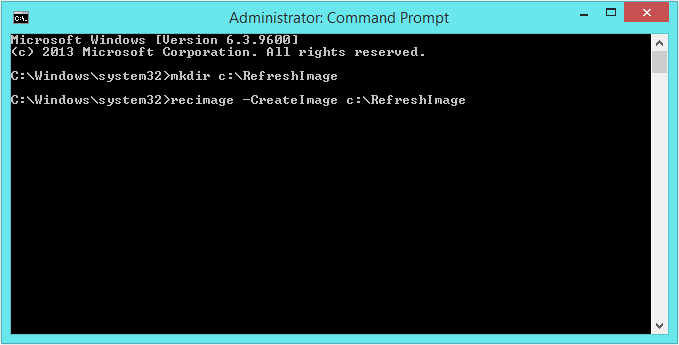
- In the Command Prompt window, Type mkdir c:\RefreshImage > Press Enter.
- In the Command Prompt window, Type recimg –CreateImage c:\RefreshImage > Press Enter.

This should create the recovery image in your computer’s C:\ partition.
Create a bootable Windows 8 Recovery Disk
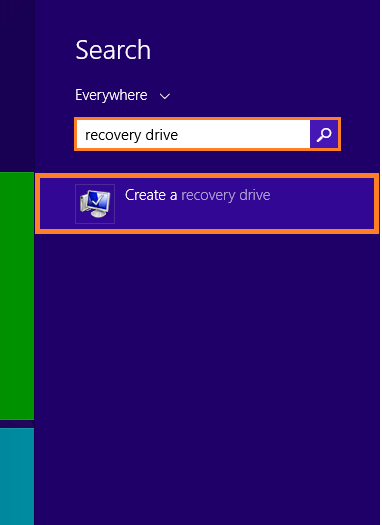
- Press the Windows Key and type recovery drive, then select Create a recovery drive. (If you are using a touch display then swipe the screen from the right side and select the Search icon, type recovery drive and select Create a recovery Drive from the search results.)

- Check the box for Copy the recovery partition from the PC to the recovery drive and click Next.
- Next, note the size of the recovery partition. If you are using a USB flash drive, make sure it has enough free space (copy any data from the USB as well or it will be deleted).
- Select the device that you want to be your recovery drive and click Next.
- Click Finish when the process is done. (you can delete the recovery image from your Windows 8 computer to free some space now).
Now you can use your Windows 8 recovery disk to rescue your Windows installation. If Windows doesn’t start, insert the USB and restart the computer. Make sure that the computer boots from the USB although it should automatically do that on its own. Then you can choose a recovery option to get your computer back to normal. This works for Windows 8 desktop and Windows 8 RT on tablets.
I Hope You Liked This Blog Article! If You Need Additional Support on This Issue Then Please Don’t Hesitate To Contact Me On Facebook.
Is Your PC Healthy?
I always recommend to my readers to regularly use a trusted registry cleaner and optimizer such as WinThruster or CCleaner. Many problems that you encounter can be attributed to a corrupt and bloated registry.
Happy Computing! ![]()

Wally’s Answer Rating
Summary: Every Windows Wally blog post is evaluated on these three criteria. The average of all three elements determines an "Overall Rating" for each blog post.


