Installing Windows 7 Service Pack 1
Reader Question:
“Hi Wally, I have Windows 7 Home edition installed on my computer, how do I upgrade to Windows 7 Service Pack 1?” – Spencer R., USA
Before addressing any computer issue, I always recommend scanning and repairing any underlying problems affecting your PC health and performance:
- Step 1 : Download PC Repair & Optimizer Tool (WinThruster for Win 10, 8, 7, Vista, XP and 2000 – Microsoft Gold Certified).
- Step 2 : Click “Start Scan” to find Windows registry issues that could be causing PC problems.
- Step 3 : Click “Repair All” to fix all issues.
Setting up weekly (or daily) automatic scans will help prevent system problems and keep your PC running fast and trouble-free.
Wally’s Answer: Windows 7 Service Pack 1 was launched in March 2010. This Windows Service Pack upgrade can be applied by using Windows Update, direct download, or by using the Windows 7 Service Pack 1 DVD.
Checking the current version of Windows
You can check the version of Windows that your computer is running by following these steps:
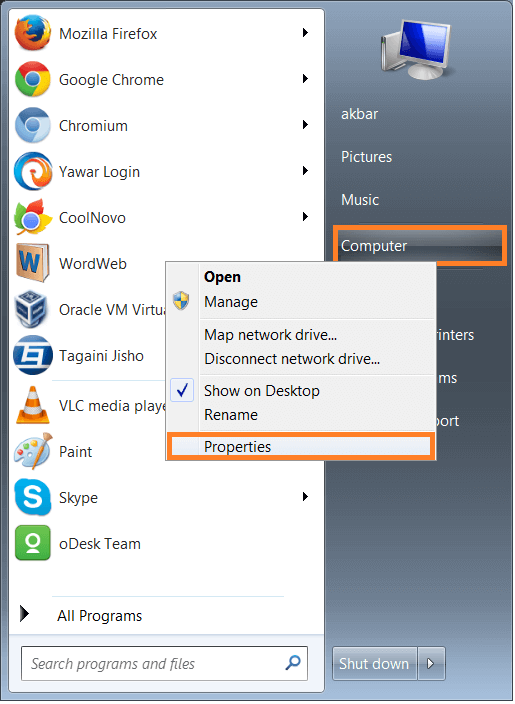
- Click the Start Button > Right-click Computer > click Properties

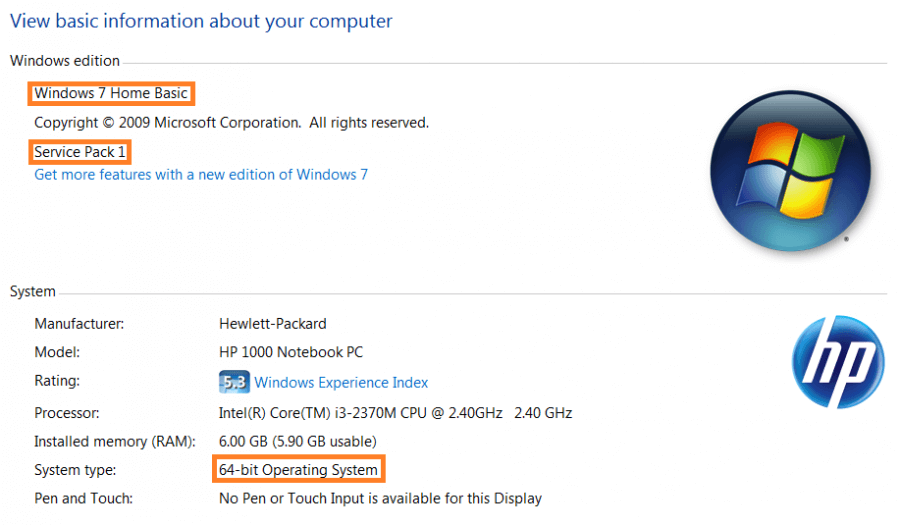
- In System Properties, you can find all sorts of information about the computer including the type of Windows (Home, Professional, Enterprise, or Ultimate), The Service Pack, and whether it is 32-bit or 64-bit.

If your computer is already running Windows 7 Service Pack 1 then there is no need to install a service pack upgrade.
What does the Windows 7 Service Pack upgrade include?
It includes some performance and security upgrades. It’s not a major upgrade, but if you want to keep your computer safer and up-to-date, you might want to install it.
Updating from Windows 7
The easiest way to upgrade to Windows 7 Service Pack 1 is to use Windows update. If automatic updates were on then, you should get the notification automatically. The update should take about 30 minutes to install.
Amount of Disk space required:
- Using the Windows update method, your installation partition should have 750MB (32-bit version), and 1050MB (64-bit version).
- Free space needed on the disk if you are installing the entire Windows 7 Service Pack 1 from a DVD or from the Microsoft website is about 4100MB (32-bit version), and 7400MB (64-bit) version. Ideally, the installation partition should have more free space on disk than the minimum disk space.
Things to do before installing Windows 7 Service Pack 1
- Back-up important data to a UBS flash drive, somewhere on the network, or on an external hard drive.
- Make sure your Windows partition has enough free space on it. If Windows 7 is already installed, and you are simply installing an upgrade then you only need about 750MB for the 32-bit version, and 1050MB for the 64-bit version.
- If your computer is a laptop, make sure that it is plugged-in and that the battery is charged.
Installing Windows 7 Service Pack 1 using Windows Update
If you are reading this, chances are that you were not notified of the Windows 7 Service pack update. Here is how to start the upgrade process using Windows Update:
- Connect your computer to the internet, since the update might need to be downloaded (if it isn’t already downloaded).
- Click the Start Button > type Windows Update > press Enter
- In the left side, click the link Check for updates
- In the list of updates, click Service Pack for Microsoft Windows (KB976932) > click OK (If the Service Pack update is not in the list, then you will need to install important updates first.)
Manually Upgrading to Windows 7 Service Pack 1
If you were not able to upgrade to Windows 7 Service Pack 1 using Windows Upgrade, you can do it by downloading the upgrade and running its setup file. You can download it from here. After downloading, just run the installation file and follow the instructions.
Installing Window 7 Service Pack 1 using a DVD
You can order the DVD online from Microsoft or buy it from somewhere else. If you are a student at a University then you can get a student discount. Here’s how to upgrade using the DVD:
- Insert the Windows 7 Service Pack 1 upgrade DVD in the computer while Windows 7 is running.
- The Installation Wizard should appear automatically. If it does not appear then: Click the Start Button > click Computer > right-click the DVD drive > click install or run a program
- Follow the on-screen instructions.
I Hope You Liked This Blog Article! If You Need Additional Support on This Issue Then Please Don’t Hesitate To Contact Me On Facebook.
Is Your PC Healthy?
I always recommend to my readers to regularly use a trusted registry cleaner and optimizer such as WinThruster or CCleaner. Many problems that you encounter can be attributed to a corrupt and bloated registry.
Happy Computing! ![]()

Wally’s Answer Rating
Summary: Every Windows Wally blog post is evaluated on these three criteria. The average of all three elements determines an "Overall Rating" for each blog post.


