Troubleshooting the BIOS
Reader Question:
“Hi Wally, My computer is not loading Windows. It stops booting immediately in the start when the black screen appears!“ - Nathan F., Canada
Before addressing any computer issue, I always recommend scanning and repairing any underlying problems affecting your PC health and performance:
- Step 1 : Download PC Repair & Optimizer Tool (WinThruster for Win 10, 8, 7, Vista, XP and 2000 – Microsoft Gold Certified).
- Step 2 : Click “Start Scan” to find Windows registry issues that could be causing PC problems.
- Step 3 : Click “Repair All” to fix all issues.
Setting up weekly (or daily) automatic scans will help prevent system problems and keep your PC running fast and trouble-free.
Wally’s Answer: BIOS problems are always related to hardware. Troubleshooting hardware problems is a bit different than troubleshooting software problems, but it a quite straightforward and logical process.
What is BIOS Anyway?
BIOS stands for basic input/output system. It is built-into the computer. When the computer starts, it always loads the BIOS first and then loads other components such as a bootloader, which then loads the computer’s operating system (Windows).
The software in BIOS is written on a ROM chip on the motherboard and can be upgraded later if need be. This software is called firmware. BIOS errors are highly unlikely. Usually, they are caused by hardware failure or due to the user changing a setting incorrectly.
Troubleshooting the BIOS
Troubleshooting the BIOS can turn out to be really easy and quick or it could take a while. The most likely problem involves POST or power-on self-test. Here are some ways that you can fix POST issues in BIOS.
Error message
If you can see an error message on the screen, take note and search for that specific error message.
Reset the BIOS
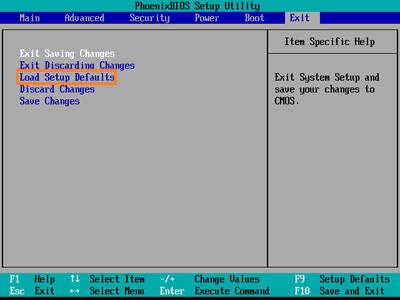
Repeatedly pressing F2 on the keyboard should bring-up the BIOS. From there you can try finding the Load Setup Defaults option or something similar. This option will recover BIOS settings to the factory configuration. After doing this, check to see if the computer starts normally. If it does start normally, then make any changes to the BIOS one by one, and restart to see the effect because one of them might have been the problem.

Inside the CPU casing
You can try disconnecting all but the most vital components and cables of the computer and then turning it on. Your computer only needs a hard drive, RAM, processor, and graphics card to run.
- If the computer has the same problems while running on minimum hardware then consider taking it to a shop for repair.
- If running the computer with minimum hardware is successful, then that means that at least the vital hardware is working fine. The other hardware must have been the problem. Attach one of the removed parts and restart. If successful, then attach another one. Keep going until you find the problematic hardware.
Check the connections
Make sure that all cables are properly connected inside the CPU casing. Remove and reconnect the RAM chips after wiping the metal teeth connectors. Make sure to reconnect the RAM while paying attention to the gaps on, matching them to the RAM slot. Make sure that the clips on the side latch-on properly.
Check the Power Supply Unit (PSU)
The power supply unit is the box inside your computer’s casing that the power cord plugs into. This component can very often cause such problems. You will have to get your computer checked by a professional to figure out if the PSU is working fine or not.
I Hope You Liked This Blog Article! If You Need Additional Support on This Issue Then Please Don’t Hesitate To Contact Me On Facebook.
Is Your PC Healthy?
I always recommend to my readers to regularly use a trusted registry cleaner and optimizer such as WinThruster or CCleaner. Many problems that you encounter can be attributed to a corrupt and bloated registry.
Happy Computing! ![]()

Wally’s Answer Rating
Summary: Every Windows Wally blog post is evaluated on these three criteria. The average of all three elements determines an "Overall Rating" for each blog post.


