Windows Connect Now and Wi-Fi are on Different Wi-Fi Channels
Reader Question:
“Hi Wally, Whenever I try to connect to my wireless printers, I see this error message: ”Windows Connect Now and Wi-Fi Access Point are on different Wi-Fi channels” Please tell me what it means and how I can get rid of this error. Thank You” – Gregory E., USA
Before addressing any computer issue, I always recommend scanning and repairing any underlying problems affecting your PC health and performance:
- Step 1 : Download PC Repair & Optimizer Tool (WinThruster for Win 10, 8, 7, Vista, XP and 2000 – Microsoft Gold Certified).
- Step 2 : Click “Start Scan” to find Windows registry issues that could be causing PC problems.
- Step 3 : Click “Repair All” to fix all issues.
Setting up weekly (or daily) automatic scans will help prevent system problems and keep your PC running fast and trouble-free.
Wally’s Answer: Using WiFi has become popular for many offices. It is easy to use, there’s no clutter of wires, any device can easily print, etc. Some offices even have their computers connected via WiFi because of how convenient it is.
Not being able to set up printers through WiFi can be a mess but don’t worry. Its easier to fix than you think.
Problem
The user is unable to connect a Wireless Printer through WiFi. Windows 10 shows the following error message:
“Windows Connect Now and Wi-Fi Access Point are on different Wi-Fi channels”

Solution
There might be something wrong with the wireless adapter’s driver or its configuration. Therefore, it would be best to delete the network adapter’s driver and then to reinstall the driver.
After that, we can try setting up the printer again and see if this solves this problem.
Try Reinstalling Your Network Adapter Drivers and Try Setting Up The Printer Again
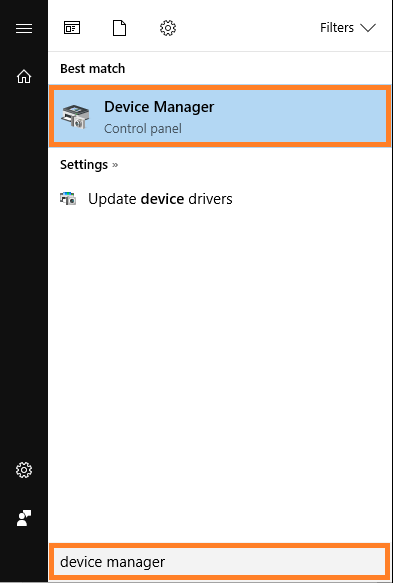
Uninstall the previous driver from Device Manager. Press the Windows Key and type device manager. Select Device Manager from the search results to launch it.

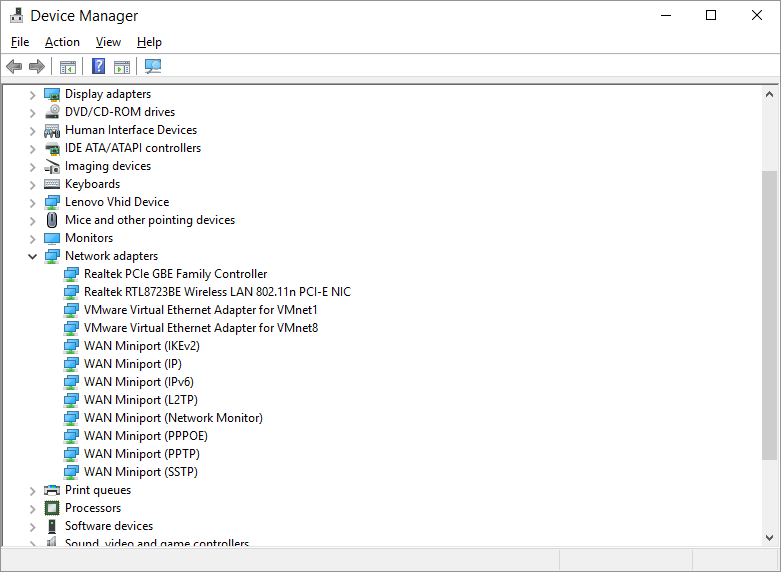
In the Device Manager, expand the Network adapters category.

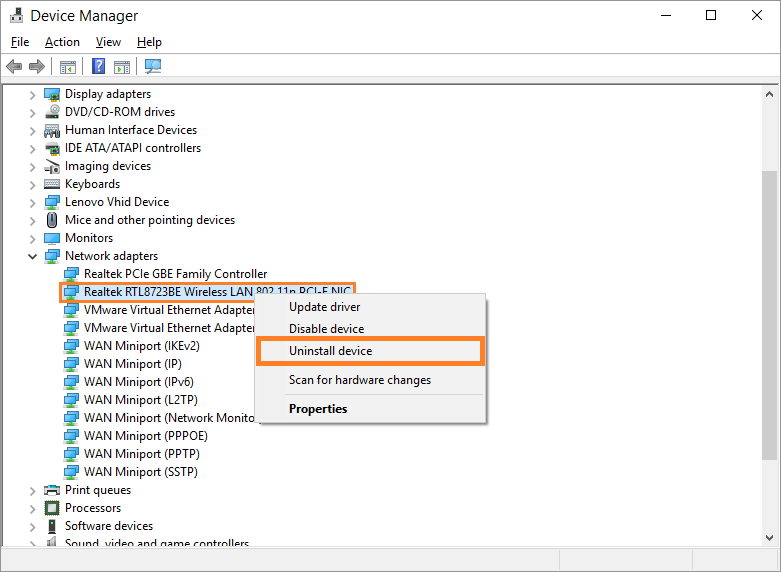
From the list of installed Network adapters, Right-click anyone that has Wireless or WAN in its name and click Uninstall to delete that driver.

Repeat this until only “Ethernet” drivers are left.
Now, we’re ready to install the Wireless driver. You can try using DriverDoc for a one-click install or visit your computer manufacturer’s website and look for your computer model there. Once you find it, look for the Network Driver and make sure to download the one meant for your version of Windows. Restart the computer and install the Wireless network adapter driver.
Read Your Printer’s Manual and Make Sure To Follow The Instructions
Now that you’ve reinstalled the network adapter driver, you can start setting up your wireless printer. Make sure to follow the instructions on your printer’s manual to the letter.
If you don’t have the manual, then you can search for it online. Simply type the correct name of your printer’s make and model along with the keyword “manual” or “PDF” when searching for it.
I Hope You Liked This Blog Article! If You Need Additional Support on This Issue Then Please Don’t Hesitate To Contact Me On Facebook.
Is Your PC Healthy?
I always recommend to my readers to regularly use a trusted registry cleaner and optimizer such as WinThruster or CCleaner. Many problems that you encounter can be attributed to a corrupt and bloated registry.
Happy Computing! ![]()

Wally's Answer Rating
Summary: Every Windows Wally blog post is evaluated on these three criteria. The average of all three elements determines an "Overall Rating" for each blog post.


